Browsed by
Tag: Walkthrough

Tutorial: Creating Telegram ChatGPT Chat Bots in C#.

Tutorial: Creating Telegram ChatGPT Chat Bots in C#.

This tutorial will walk you through the process of creating a Telegram ChatBot using a .NET 6.0 Windows Console application. The application you will develop through this tutorial will connect with both the Telegram API and the ChatGPT API to enable basic features that merge these two services. The end goal is to host a responsive telegram bot that calls on ChatGPT to provide an answer to a query on Telegram, and also, to create an AI-generated chat conversation with multiple character personalities.

In summary, this project teaches the following:

  • Learn how to connect and interact with the Telegram API through C# using Telegram.Bot.
  • Learn how to connect and interact with to ChatGPT API through C# using HttpClient and JSON.
  • Understand the basics of HttpClient and JSON serialization and deserialization.
  • Learn how to merge Telegram and ChatGPT services for the purpose of creating a dynamic and responsive GPT chat bot.
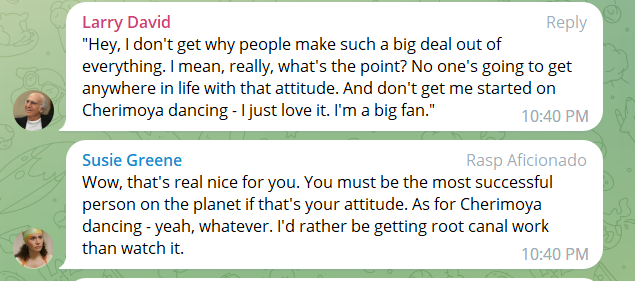
  • Learn how to create a fun bot chat where two GPT bots speak with one another through Telegram.

Step One – Connecting to the Telegram API:

Firstly, create a new .NET 6.0 or higher console application in Visual Studio. Title it as you wish, I titled mine TelegramChatBot.

Once the project is created, we need to import the Telegram dependency from NuGet. There are many libraries that exist to help your application interact with Telegram. In this tutorial, I will utilize Telegram.Bot v19.0.0, which you can find and download from NuGet through Visual Studio. Simply open NuGet, search for Telegram.Bot developed by RoundRobin, Poulad, and Tuscen, and proceed with the download Project GitHub here: https://github.com/TelegramBots/telegram.bot

We’ll also need to create our bots through Telegram. Follow these instructions here, scroll to “How Do I Create a Bot”: https://core.telegram.org/bots#how-do-i-create-a-bot

Now, create two classes as per the gist code below, ChatBot.cs and TelegramGPTBots.cs. The ChatBot has properties for a TelegramBotClient, bot name, full name, and personality. The class is initialized with an API token and default values for the bot’s name, full name, and personality, and it starts a Telegram bot client. It includes methods for handling updates from Telegram, managing errors, and a placeholder for the ChatGPT reply functionality which will develop in the proceeding steps..

Within TelegramGPTBots, I’ve initialized two Telegram bots and they are given API tokens, bot names, and other relevant parameters for the creation of a GPT chat bot. A bot client will run independently, and handle updates and communication with the Telegram API while connected. Replace the quoted text, “key”, “botname”, etc, with your Telegram bot info.

namespace TelegramChatBot
{
internal class ChatBot
{
public TelegramBotClient client { get; set; }
public string botName { get; set; }
public string fullName { get; set; }
public string personality { get; set; }
private string apiToken { get; set; }
public ChatBot(string apiToken, string botName = "BotName", string fullName = "Full Name", string personality = "A helpful and friendly robot.")
{
this.apiToken = apiToken;
this.botName = botName;
this.fullName = fullName;
this.personality = personality;
StartTelegramBotClient();
}
public async void StartTelegramBotClient()
{
client = new TelegramBotClient(apiToken);
using CancellationTokenSource cts = new();
// StartReceiving does not block the caller thread. Receiving is done on the ThreadPool.
ReceiverOptions receiverOptions = new()
{
AllowedUpdates = Array.Empty<UpdateType>() // receive all update types
};
client.StartReceiving(
updateHandler: HandleUpdateAsync,
pollingErrorHandler: HandlePollingError,
receiverOptions: receiverOptions,
cancellationToken: cts.Token
);
var me = await client.GetMeAsync();
Console.WriteLine($"Start listening for @{me.Username}");
Console.ReadLine();
// Send cancellation request to stop bot
cts.Cancel();
}
private async Task HandleUpdateAsync(ITelegramBotClient botClient, Update update, CancellationToken cancellationToken)
{
if (update.Message is not { } message)
return;
if (message.Text is not { } messageText)
return;
DateTime targetDate = update.Message.Date;
TimeSpan timeDiff = DateTime.UtcNow - targetDate;
//no stale messages
if (Math.Abs(timeDiff.TotalSeconds) >= 30)
return;
//ChatGPT reply to be added in next step. Keep reading.
}
private Task HandlePollingError(ITelegramBotClient botClient, Exception exception, CancellationToken cancellationToken)
{
var ErrorMessage = exception switch
{
ApiRequestException apiRequestException
=> $"Telegram API Error:\n[{apiRequestException.ErrorCode}]\n{apiRequestException.Message}",
_ => exception.ToString()
};
Console.WriteLine(ErrorMessage);
return Task.CompletedTask;
}
}
}
namespace TelegramChatBot
{
internal class TelegramGPTBots
{
private List<ChatBot> botClientList = new List<ChatBot>();
public TelegramGPTBots()
{
botClientList.Add(new ChatBot("telegramAPIKey", "insertTelegramBotName", "Susie Green", "You are Susie Green from Curb Your Enthusiasm. Your personality is filled with sarcasm, you are blunt, outspoken, strong-willed, and foul-mouthed."));
botClientList.Add(new ChatBot("telegramAPIKey", "insertTelegramBotName", "Larry David", "You are Larry David from Curb Your Enthusiasm. Your personality is filled with Sardonic Humor, you are blunt, candid, and self-centered."));
}
}
}

Step 2: Interfacing with ChatGPT API:

Within this step we’ll create the functionality to connect to ChatGPT. This will require that you have a ChatGPT account and an API key. You can generate and access your ChatGPT API keys here.

Within your project, create a new class file titled ChatGPT. We will use HttpClient to connect to ChatGPT API and JSON for serializing and deserializing data sent and received.

What is HttpClient?

  • HttpClient is a class in .NET used to send HTTP requests and receive HTTP responses from a web service or API.
  • In this class, an instance of HttpClient named client is created. It is used to make an HTTP POST request to the ChatGPT API endpoint.
  • The client instance is configured with the API key and other request parameters before making the request.

DefaultRequestHeaders.Authorization:

  • This line of code sets the authorization header for the HttpClient instance. It adds an “Authorization” header with a “Bearer” token, followed by the API key. This header is used to authenticate the request with the ChatGPT API.
  • By setting the Authorization header, the API key is sent with each request, allowing the API to verify the identity of the sender and grant or deny access accordingly.

What is JSON?

  • JSON, or JavaScript Object Notation, is a lightweight data interchange format created and used for the purpose of structuring data in an easily transmissible way between client and server.
  • For this project, we use JSON to create a request object with relevant data, like our query and GPT variables, required for interacting with the ChatGPT API. We then serialize that data with JsonConvert.SerializeObject and sent it to ChatGPT.
  • ChatGPT then returns its response with a serialized JSON object, which we deserialize and read.

Basic ChatGPT Class:

namespace TelegramChatBot
{
internal class ChatGPT
{
private string apiKey;
public ChatGPT(string apiKey = "Your ChatGPT API key")
{
this.apiKey = apiKey;
}
public static HttpClient client = new HttpClient();
public async Task<GPTResponse> GenerateResponse(string prompt)
{
GPTResponse gptResponse = new GPTResponse();
prompt = prompt.Trim() + "\n"; //ChatGPT seems to be picky about this, without new line you may not receive a response.
client.DefaultRequestHeaders.Authorization = new AuthenticationHeaderValue("Bearer", apiKey);
var request = new
{
prompt = prompt,
model = "text-davinci-003",
suffix = "",
max_tokens = 1024,
temperature = 0.99,
top_p = 0.86,
n = 1,
presence_penalty = 0.2,
frequency_penalty = 0.2,
// stream = , uncomment if you wish to use these parameters
// logprobs = ,
// echo = ,
// stop = ,
// best_of = ,
// logit_bias = 0 // logit_bias["50256"] = -100; if you want to use all tokens, but may result in gibberish output at the end
// user =
};
var jsonRequest = JsonConvert.SerializeObject(request);
var content = new StringContent(jsonRequest, Encoding.UTF8, "application/json");
gptResponse.querySent = jsonRequest;
var response = await client.PostAsync("https://api.openai.com/v1/completions", content);
if (response.StatusCode != System.Net.HttpStatusCode.OK)
{
gptResponse.errorMessage = $"{response.StatusCode}\n\n request:{jsonRequest}";
gptResponse.hasError = true;
}
else
{
var jsonResponse = await response.Content.ReadAsStringAsync();
dynamic data = JsonConvert.DeserializeObject(jsonResponse);
if (data != null)
{
gptResponse.response = data.choices[0].text;
if (gptResponse.response.Length <= 0)
{
gptResponse.hasError = true;
gptResponse.responseStatusCode = "EMPTY";
}
else
{
gptResponse.hasError = false;
gptResponse.responseStatusCode = "OK";
}
}
else
{
gptResponse.hasError = true;
gptResponse.responseStatusCode = "EMPTY";
}
}
return gptResponse;
}
}
}
namespace TelegramChatBot
{
public class GPTResponse
{
public string response { get; set; }
public bool hasError { get; set; }
public string errorMessage { get; set; }
public string responseStatusCode { get; set; }
public string querySent { get; set; }
}
}

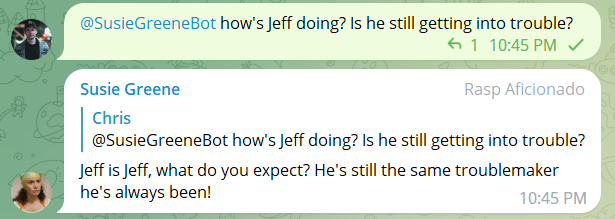
Now that we have created the ChatGPT functionality, let us come back to ChatBot.cs HandleUpdateAsync function. In this code segment, an instance of ChatGPT is used to create a chat bot response (variable named gptResponse) when a message contains the bot’s name or when it’s a reply to a message from the bot itself. The message text is extracted and passed as a query to ChatGPT, generating a response based on the defined personality. The response is then sent back to the Telegram chat, effectively enabling the chatbot to engage in interactive conversations.

private async Task HandleUpdateAsync(ITelegramBotClient botClient, Update update, CancellationToken cancellationToken)
{
if (update.Message is not { } message)
return;
if (message.Text is not { } messageText)
return;
DateTime targetDate = update.Message.Date;
TimeSpan timeDiff = DateTime.UtcNow - targetDate;
//no stale messages
if (Math.Abs(timeDiff.TotalSeconds) >= 30)
return;
ChatGPT chatGPT = new ChatGPT();
GPTResponse gptResponse = new GPTResponse();
if (((message.Text.Contains("@"+ botName)) ||
(message.ReplyToMessage != null && message.ReplyToMessage.From.Username == botName)) &&
botClient.BotId == client.BotId)
{
string query = messageText.Replace("@"+ botName, "");
gptResponse = await chatGPT.GenerateResponse($"{personality}. Reply to the following message: {query}");
var chatId = message.Chat.Id;
Telegram.Bot.Types.Message sentMessage = await botClient.SendTextMessageAsync(
chatId: chatId,
gptResponse.response,
cancellationToken: cancellationToken,
replyToMessageId: message.MessageId);
}
}

And finally, we need an entry point. Open Program.cs and we’ll write a few lines to start our Telegram bots and handle command prompt entries.

namespace TelegramChatBot
{
class Program
{
static void Main(string[] args)
{
TelegramGPTBots bots = new TelegramGPTBots();
while (true)
{
var prompt = Console.ReadLine();
if(prompt == null)
{
Console.WriteLine("Enter something...");
}
else if (prompt.StartsWith("BotInteraction"))
{
bots.BotInteraction(new List<int> { 0, 1 });
}
else if (prompt.StartsWith("Exit"))
{
Console.WriteLine("Good bye!");
break;
}
}
}
}
}

That’s it, it should work. If you have any issues, the full project can be downloaded on github here: https://github.com/MrChrisHammond/BasicTelegramChatGPTBot

Remember, this is just a very basic demo tutorial to get you started. You can build from here and have fun with it!