Browsed by
Tag: ChatGPT

Simple ChatGPT Telegram Multi Chat Bot Windows Console Application

Simple ChatGPT Telegram Multi Chat Bot Windows Console Application

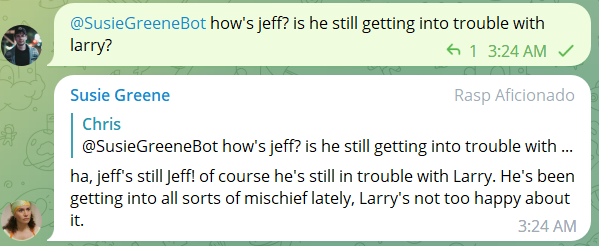
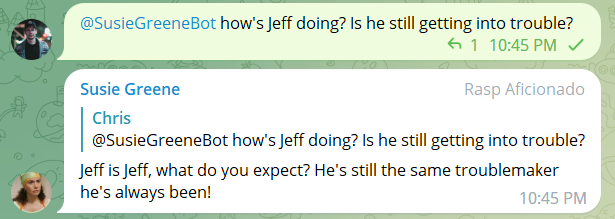
This simple console application interfaces Telegram with ChatGPT, allowing Telegram bots to act as agents relaying messages to and from OpenAI’s ChatGPT, based on a personality assigned to the bot. From Telegram, you can query the bot, which relays the message to the ChatGPT API, queries OpenAI, and receives a response based on the personality of your Telegram bot, as customized within the configuration file. This was a quick one-day project, and I thought I’d share it online. I’ll add more features over time, so check back.

Download:

Download Telegram ChatGPT Bots Windows Console App – 2023-10-17 v0.1a zip
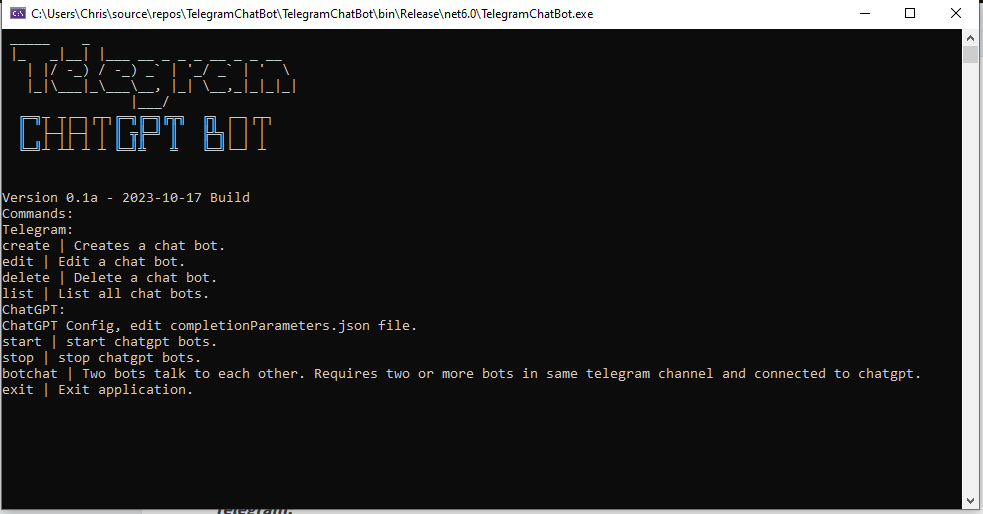
Commands:
Telegram:
create | Creates a chat bot.
edit | Edit a chat bot.
delete | Delete a chat bot.
list | List all chat bots.
ChatGPT:
start | start chatgpt bots.
stop | stop chatgpt bots.
botchat | Two bots talk to each other. Requires two or more bots in same telegram channel and connected to chatgpt.
exit | Exit application.

Getting Started:

To use this application you will need to modify the configuration files to interface the application with your Telegram bots and also your ChatGPT account. Below are the instructions on how to do this.

Telegram Bots:

How to create a bot:

  1. Start a chat with BotFather.
  2. Click Menu and select NewBot or type /newbot.
  3. Enter the bot name.
  4. Enter the username for the bot, it must end with ‘bot’ and must be unique.
  5. Congratz, you’ve just created a telegram bot. Copy the HTTP API token into bots.json file. In addition, add your botName (the bot’s telegram username) and full name, the ordinary name of the bot.
  6. Enter a description of the personality you would like the bot to have. This will guide the bot’s personality when it uses ChatGPT to generate and respond.

Connecting to ChatGPT:

  1. Visit OpenAI API key page.
  2. Click “Create new secret key” and copy it to clipboard, then paste it into completionParameters.json apiKey : “your chatgpt api key here” and replace the text in the quotes. IMPORTANT: Never share your API key with anyone as this key can be used to access OpenAI services through your account.
  3. Configure the settings of completionParameters.json to cater to your needs.

Important: I strongly advise implementing a usage limit for your OpenAI API account. Additionally, it’s advisable to restrict the usage of the API to a private Telegram channel. Querying ChatGPT typically incurs real-world computational costs. You can adjust the “max_tokens” per query using “completionParameters.json,” but please be aware that if your channel is open to the public, other users may also make queries with your bot, potentially leading to additional costs.

Brief explanation of each configuration parameter:

  • “apiUrl”: The URL for making requests to the OpenAI ChatGPT API.
  • “apiModelsUrl”: The URL for accessing information about available models.
  • “apiKey”: Your authentication key to access the ChatGPT API.
  • “model”: The specific ChatGPT model to be used, in this case, “text-davinci-003.”
  • “prompt”: The initial text or context provided to the model to generate responses.
  • “suffix”: An optional additional text to add to the end of generated responses.
  • “max_tokens”: The maximum number of tokens in the response, with a range between 1 and 4096.
  • “temperature”: A parameter controlling the randomness of the output, with a range between 0.2 and 1.0.
  • “top_p”: A value to control the diversity of the output, with a range between 0.0 and 1.0.
  • “n”: The number of alternative responses to generate, with a range between 1 and 20.
  • “stream”: A boolean indicating whether to stream the response or get it as a whole.
  • “logprobs”: Optional setting for obtaining log probabilities for each token in the response.
  • “echo”: A boolean indicating whether to include the input prompt in the output.
  • “stop”: An optional string that, if encountered in the response, will stop the generation.
  • “presence_penalty”: A penalty value to discourage the model from repeating a specific response, with a range between -1.0 and 1.0.
  • “frequency_penalty”: A penalty value to discourage the model from using frequent words, with a range between -1.0 and 1.0.
  • “best_of”: The number of “n” alternatives to consider and return the best one from, with a range between 1 and 20.
  • “logit_bias”: An optional dictionary to influence the output distribution.
  • “user”: An optional field for specifying a user identifier.
  • “role”: An optional field for specifying a role identifier.

Config files are found in the same folder as TelegramChatBot. These files must remain in folder or the application will not run.

Now that you’ve configured the application, open TelegramChatBot.exe and type “start”. That’s it, it should work from here provided you didn’t make any mistakes.

1) bots.json
2) completionParameters.json

Tutorial: Creating Telegram ChatGPT Chat Bots in C#.

Tutorial: Creating Telegram ChatGPT Chat Bots in C#.

This tutorial will walk you through the process of creating a Telegram ChatBot using a .NET 6.0 Windows Console application. The application you will develop through this tutorial will connect with both the Telegram API and the ChatGPT API to enable basic features that merge these two services. The end goal is to host a responsive telegram bot that calls on ChatGPT to provide an answer to a query on Telegram, and also, to create an AI-generated chat conversation with multiple character personalities.

In summary, this project teaches the following:

  • Learn how to connect and interact with the Telegram API through C# using Telegram.Bot.
  • Learn how to connect and interact with to ChatGPT API through C# using HttpClient and JSON.
  • Understand the basics of HttpClient and JSON serialization and deserialization.
  • Learn how to merge Telegram and ChatGPT services for the purpose of creating a dynamic and responsive GPT chat bot.
  • Learn how to create a fun bot chat where two GPT bots speak with one another through Telegram.

Step One – Connecting to the Telegram API:

Firstly, create a new .NET 6.0 or higher console application in Visual Studio. Title it as you wish, I titled mine TelegramChatBot.

Once the project is created, we need to import the Telegram dependency from NuGet. There are many libraries that exist to help your application interact with Telegram. In this tutorial, I will utilize Telegram.Bot v19.0.0, which you can find and download from NuGet through Visual Studio. Simply open NuGet, search for Telegram.Bot developed by RoundRobin, Poulad, and Tuscen, and proceed with the download Project GitHub here: https://github.com/TelegramBots/telegram.bot

We’ll also need to create our bots through Telegram. Follow these instructions here, scroll to “How Do I Create a Bot”: https://core.telegram.org/bots#how-do-i-create-a-bot

Now, create two classes as per the gist code below, ChatBot.cs and TelegramGPTBots.cs. The ChatBot has properties for a TelegramBotClient, bot name, full name, and personality. The class is initialized with an API token and default values for the bot’s name, full name, and personality, and it starts a Telegram bot client. It includes methods for handling updates from Telegram, managing errors, and a placeholder for the ChatGPT reply functionality which will develop in the proceeding steps..

Within TelegramGPTBots, I’ve initialized two Telegram bots and they are given API tokens, bot names, and other relevant parameters for the creation of a GPT chat bot. A bot client will run independently, and handle updates and communication with the Telegram API while connected. Replace the quoted text, “key”, “botname”, etc, with your Telegram bot info.

Step 2: Interfacing with ChatGPT API:

Within this step we’ll create the functionality to connect to ChatGPT. This will require that you have a ChatGPT account and an API key. You can generate and access your ChatGPT API keys here.

Within your project, create a new class file titled ChatGPT. We will use HttpClient to connect to ChatGPT API and JSON for serializing and deserializing data sent and received.

What is HttpClient?

  • HttpClient is a class in .NET used to send HTTP requests and receive HTTP responses from a web service or API.
  • In this class, an instance of HttpClient named client is created. It is used to make an HTTP POST request to the ChatGPT API endpoint.
  • The client instance is configured with the API key and other request parameters before making the request.

DefaultRequestHeaders.Authorization:

  • This line of code sets the authorization header for the HttpClient instance. It adds an “Authorization” header with a “Bearer” token, followed by the API key. This header is used to authenticate the request with the ChatGPT API.
  • By setting the Authorization header, the API key is sent with each request, allowing the API to verify the identity of the sender and grant or deny access accordingly.

What is JSON?

  • JSON, or JavaScript Object Notation, is a lightweight data interchange format created and used for the purpose of structuring data in an easily transmissible way between client and server.
  • For this project, we use JSON to create a request object with relevant data, like our query and GPT variables, required for interacting with the ChatGPT API. We then serialize that data with JsonConvert.SerializeObject and sent it to ChatGPT.
  • ChatGPT then returns its response with a serialized JSON object, which we deserialize and read.

Basic ChatGPT Class:

Now that we have created the ChatGPT functionality, let us come back to ChatBot.cs HandleUpdateAsync function. In this code segment, an instance of ChatGPT is used to create a chat bot response (variable named gptResponse) when a message contains the bot’s name or when it’s a reply to a message from the bot itself. The message text is extracted and passed as a query to ChatGPT, generating a response based on the defined personality. The response is then sent back to the Telegram chat, effectively enabling the chatbot to engage in interactive conversations.

And finally, we need an entry point. Open Program.cs and we’ll write a few lines to start our Telegram bots and handle command prompt entries.

That’s it, it should work. If you have any issues, the full project can be downloaded on github here: https://github.com/MrChrisHammond/BasicTelegramChatGPTBot

Remember, this is just a very basic demo tutorial to get you started. You can build from here and have fun with it!