Stream Buddy Instruction Manual
V1.0 Originally published on September 13, 2016
Important: Stream Buddy has discontinued and no longer supported. Use the software at your own risk.
Keyboard Shortcuts and Mouse Commands:
| Keys | Function |
| O | Pulls up option menu |
| Esc | Pulls up main menu |
| Left Shift + S | While in Orthographic view only, enables shooting and camera movement by mouse click. |
| Left Mouse Click in Orthographic View | If shooting mode enabled in orthographic view (top down view), left click will shoot bullets down from camera. |
| Right Mouse Click in Orthographic View | If shooting mode enabled, this will allow you to move the camera around. Remember, this is for orthographic view only (top down view). |
Character Selection:
The first time you open Stream Buddy, you will be prompted with TOS/EULA and then be asked to pick your character. This is a simple and straight forward process, you simply select your character, click on “Create Character”, then customize the colour tint if you wish to do so, and then click “Complete”.
If you wish to go back and create a new character, simply press the O key on your keyboard, and then click on “Select Character” (located on the top right of the option menu).
Setting up your Microphone:
It is recommended that you use a microphone with decent audio quality to ensure clean audio input. Any plug and play microphone will technically work with Stream Buddy, however, lower quality microphones may cause issues with speech to character mouth movement synchronization.
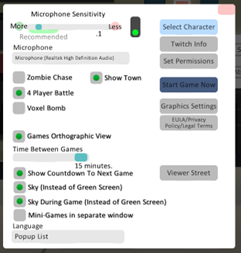
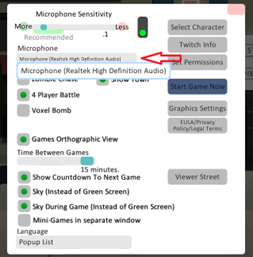
Stream Buddy will automatically detect all microphones plugged into your computer so long as they are enabled within Windows and attached to your computer prior to opening Stream Buddy. If you have multiple microphone sources, you can choose which microphone you want to use within Stream Buddy options by pressing the O key after you have selected your first character.
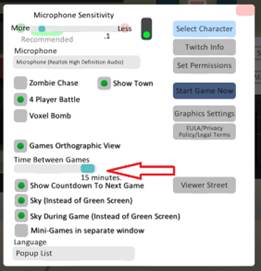
To ensure your audio input is loud enough, you then should use the Microphone Sensitivity horizontal scrollbar to adjust the microphone level. Dragging the green knob to the left on the horizontal scrollbar will increase microphone sensitivity, making quieter noises move your characters mouth.
Tips: If you find that your characters mouth isn’t moving when you try talking into your microphone, try increasing the sensitivity by dragging the green knob to the left on the Microphone Sensitivity scroll bar.
Trouble shooting:
Microphone not showing up? Make sure that your microphone is enabled within Windows first before opening Stream Buddy.
Connecting to Twitch:
Stream Buddy makes use of the Twitch API to allow your viewers to participate in a more in-depth way. By tapping into Twitch chat, Stream Buddy can then see who is watching your stream and sending chat messages in your stream chat, making use of this for games and the Viewer Street feature.
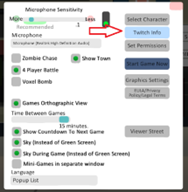
To connect to Twitch, open the option menu by pressing O on your keyboard. Then click Twitch Info located near the top right of the option menu.
The Twitch Info menu will pop up. Please read all the dialogue and make sure you are not streaming live at this point as you will need to copy in your Twitch Code. You should NEVER reveal your twitch IRC code while on stream as this can be used by others to impersonate you through IRC chat.
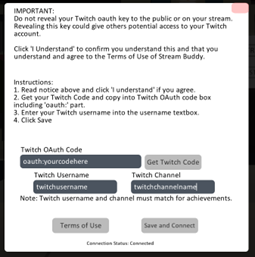
To obtain your Twitch Code, click “Get Twitch Code”. Your browser will open and you will be directed to “Twitch Chat OAuth Password Generator”. Click the “Connect to Twitch” button and log into Twitch, then copy the full oauth code provided into the Twitch OAuth code textbox. It is important to make sure you copy the entrie code in, including the beginning portion that starts with “oauth:”
Next, type in your twitch username into the “Twitch Username” textbox. After, type in your twitch channel name – which for most people will be the exact same as your twitch username.
After, click “Save and Connect”. It will take a few seconds to connect to the Twitch API, but once the Connection Status at the bottom says connected, you will then be hooked into your twitch channel.
Why is there a textbox for channel name?
You can put another user’s channel name into the “Twitch Channel” and then with features like “Viewer Street”, their viewers will show up instead of yours. IMPORTANT NOTE: You will only get achievements if you are in your own twitch channel. You can always go back and forth, but total online time is only counted when you are in your own twitch channel.
Setting up the Mini Games:
Mini-games are part of Stream Buddy for the entertainment of your viewers. They are also a great way for you to give away prizes or determine contest winners on your stream.
In order for your stream viewers to participate, Stream Buddy must first be connected to Twitch and your Twitch channel.
The games can start in two ways, either based on the timer set in the options or by pressing “Left Ctrl + S” to start a game immediately. You can also disable the games timer by pressing “Left Ctrl + D” or enable them again by pressing “Left Ctrl + D” once more.
Setting Time between games:
Games start every x amount of minutes, where x is the number set in the options. To set the length of time between games, open the option menu by pressing O on your keyboard. Then adjust the “Time Between Games” horizontal scroll bar.
Picking which games to play:
You can set which games to play by ticking each game. The current three games available are “Zombie Chase”, “4 Player Battle”, and “Voxel Bomb”.
Selecting a game view:
Some games can be played in either orthographic view (top down view) or third person point of view. You can set which view you would prefer by ticking “Games Orthographic View” (top down view), or unticking this option will allow games to be viewed in third person view.
Mini-Games in Separate Window
This is an important function for OBS and xSplit users if you would like to have a difference scene view activated when a mini-game starts. The reason for this is because you might have your scene in OBS or xSplit set for your Stream Buddy avatar as only a small portion of your screen, but for the mini-games you may prefer full screen. If you enable Mini-Games in a separate window, whenever a mini-game starts it will launch a separate EXE for the mini-game, which you can then set to full screen or whichever size you prefer.
Setting up Viewer Street
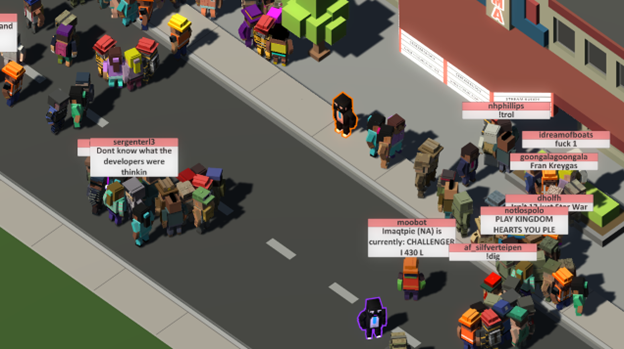
Viewer Street is a feature to allow you to visualize and see your stream viewers chatting by having them walk through the Stream Buddy town as if they are characters in the town. As your viewers type messages, they will begin to appear in Stream Buddy on Viewer Street (the main street in Stream Buddy). You can control how many viewers appear in the options and also set which view you would prefer. Note that only viewers who are active in chat typing messages will appear and viewers who don’t type a message after several minutes will then walk off of viewer street to make room for active users.
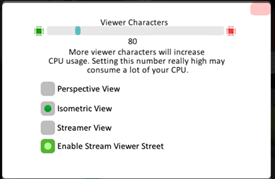
Viewer Street has three camera view options:
Perspective View: Using a POV type camera, it overlooks your town from third person view.
Isometric View: Using an orthographic type camera, it overlooks the town from an isometric type of view.
Streamer View: Using third person view of your 3d avatar, the camera is fixed on you with the viewer characters walking around while the camera is focused on your character.
Number of Viewer Characters:
It is important to note that setting a higher number of viewer characters will also increase CPU load. This is because each viewer character when walking around uses a path finding algorithm and while most modern computers should be able to handle this with ease, nonetheless when you combine the overhead of your streaming application to render your screen and broadcast, plus any other game you might be playing, CPU usage can quickly get out of hand. Generally 25 to 80 characters is usually more than enough as going above this, while possible, may also lead to overcrowding of people!
Moving the Isometric Camera and shooting your viewers:
Yes you can shoot your viewers! To reign bullets down on your viewers, makes sure you have Isometric View set in the Viewer Street options. Then close all open menu panels and press “Left Shift + S”. This will unlock the camera to move it around and allow you to shoot down.
To shoot, left click on your mouse. To move the camera only, hold down the right button of your mouse.
Note that when you shoot a character, generally 5 shots will be enough to knock that viewer to the ground. However, viewers revive after a random amount of time.
Language Options:
Stream Buddy provides three different languages at launch, with more languages coming as we move from Early Access to Full Release. The current languages provided are English, French, and Russian. To set the language, open the option menu by pressing O on your keyboard. At the bottom left of the option menu there is a drop down combo box which will allow you to select the language of your choice.
By default, the first time you open Stream Buddy it should automatically adjust to your system language if your operating system locale is set to English, French, or Russian. However, if it does not, you can manually set the language based on the instructions above.
Twitch Chat Commands:
Your twitch viewers can interact with your character, sending it instructions to perform certain animations like dancing, saluting, smoking, and sitting.
| !dance | Your avatar will dance. |
| !sit | Your avatar will sit. |
| !standstraight | Your avatar will stand up. |
| !armswaist | Your avatar will place its arms on its waist. |
| !kickback | Your avatar will kick back to relax. |
| !sad | Your avatar will sit in a sad pose. |
| !play | Player command to join a game when the game is in lobby mode. |
| !battlegame | Start a game |