I recently came across a small issue with AndroidX not compiling in a Maui project after updating CommunityToolkit.Maui and Microsoft.Maui.Controls. The error message presented:
1>MSBUILD : java.exe error JAVA0000: Error in C:\Users\{User}.nuget\packages\xamarin.androidx.collection.jvm\1.4.0.4\buildTransitive\net8.0-android34.0….\jar\androidx.collection.collection-jvm.jar:androidx/collection/ArrayMapKt.class:
Type androidx.collection.ArrayMapKt is defined multiple times
There’s a simple solution, install nuget package xamarin.androidx.fragment.ktx, which will provide bindings for AndroidX library.
After adding this package, this error resolved for me and compilation completed.
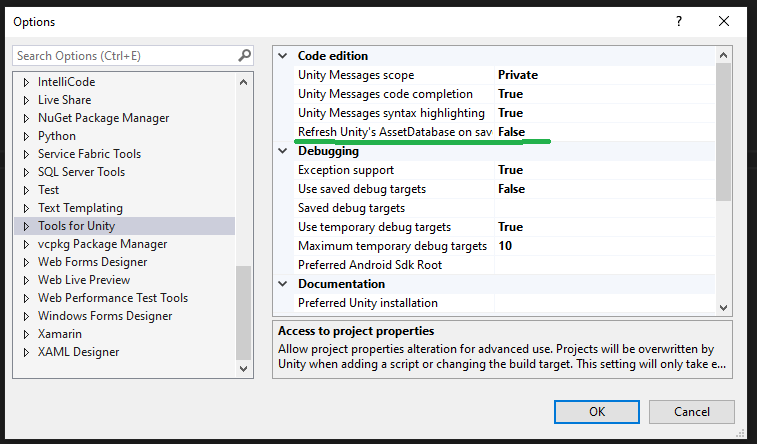
Stop Unity from compiling every time you save a script in Visual Studio
It can quickly become a frustrating experience when one small change and save to a script causes your entire project to recompile in Unity when tabbing back and forth from Unity and Visual Studio (VS). This is especially frustrating if you tab back and forth frequently, only to be prompted with the script recompiling loading bar.
Googling this and looking for a solution on StackExchange, Unity discussion forum, among other places, the responses do not directly address the question. Some people have recommend disabling Unity Editor Auto Refresh in the General options in Unity 2021 or earlier, or Asset Pipeline in Unity 2022 or later. Unfortunately, this doesn’t respond to this specific issue. Another recommendation is to add Burst in Unity’s Package Manager – and while this improves and optimizes compilation, it does not stop every small save in VS from compiling. In fact, the solution is not found in Unity Editor, but rather, in VS which is refreshing Unity’s AssetDatabase through Tools for Unity every time a file is saved.
There’s a really simple solution in Visual Studio:
In Visual Studio 2019 or 2022, click Tools -> Options -> Tools for Unity -> Refresh Unity’s AssetDatabase on save -> Set to False.
Then close and reopen Unity and Visual Studio for the changes to take place. That’s it. And when you do want to compile, simply press Ctrl + R within the Unity Editor.
A thread safe way of updating the main thread from another thread in Unity
As you develop your game or project, you may require updating the main thread from within another thread. If you’re stuck and need a solution, here’s a quick way to get things moving.
The code defines a class named MainThreadDispatcher. This class is designed to enable the execution of actions on the main Unity thread from other threads in a thread-safe manner. It accomplishes this by using a ConcurrentQueue to store and process actions, and ConcurrentQueue handles all synchronization internally.
The Update method is automatically called once per frame by Unity, and it dequeues and executes actions from the concurrentActionQueue while ensuring that the operation is thread-safe. Additionally, a static method EnqueueAction is provided to allow other parts of the code to enqueue actions for execution on the main thread.
This mechanism is useful for handling tasks that require interaction with Unity’s main thread from background or worker threads, such as updating UI elements, handling game events, or modifying Unity objects in a thread-safe way.
To use this, create a GameObject in your scene and attach a script with the following:
using System.Collections;
using System.Collections.Generic;
using UnityEngine;
using System.Collections.Concurrent;
using System;

public class MainThreadDispatcher : MonoBehaviour
{
    private static ConcurrentQueue<Action> concurrentActionQueue = new ConcurrentQueue<Action>();

    // Update is called once per frame
    void Update()
    {
        while (concurrentActionQueue.TryDequeue(out var actionItem))
        {
            actionItem();
        }
    }
    public static void EnqueueAction(Action action)
    {
        concurrentActionQueue.Enqueue(action);
    }
}
ThreadWorker example to test the MainThreadDispatcher:
MainThreadDispatcher.EnqueueAction method queues an actions for execution on the Unity main thread. A lambda expression is used to encapsulate a set of actions. By enqueuing this lambda expression, it ensures that these actions are performed on the main thread, thereby safely allowing changes to Unity objects and user interface elements without risking threading issues.
using System.Collections;
using System.Collections.Generic;
using UnityEngine;
using System.Threading;

public class ThreadedWork : MonoBehaviour
{
    private bool isUpdating = false;
    void Start()
    {
        // Start a background thread to perform work
        Thread backgroundThread = new Thread(PerformBackgroundWork);
        backgroundThread.Start();
    }
    private void PerformBackgroundWork()
    {
        while(true)
        {
            // Simulate some work on a different thread
            Thread.Sleep(5000);
            // To update the main thread, enqueue an action
            MainThreadDispatcher.EnqueueAction(() =>
            {
                isUpdating = true;
                // Perform any updates or modifications to Unity objects here

                isUpdating = false;
            });
        }
    }
}
Tutorial: Creating Telegram ChatGPT Chat Bots in C#.
This tutorial will walk you through the process of creating a Telegram ChatBot using a .NET 6.0 Windows Console application. The application you will develop through this tutorial will connect with both the Telegram API and the ChatGPT API to enable basic features that merge these two services. The end goal is to host a responsive telegram bot that calls on ChatGPT to provide an answer to a query on Telegram, and also, to create an AI-generated chat conversation with multiple character personalities.
In summary, this project teaches the following:
Learn how to connect and interact with the Telegram API through C# using Telegram.Bot.
Learn how to connect and interact with to ChatGPT API through C# using HttpClient and JSON.
Understand the basics of HttpClient and JSON serialization and deserialization.
Learn how to merge Telegram and ChatGPT services for the purpose of creating a dynamic and responsive GPT chat bot.
Learn how to create a fun bot chat where two GPT bots speak with one another through Telegram.
Step One – Connecting to the Telegram API:
Firstly, create a new .NET 6.0 or higher console application in Visual Studio. Title it as you wish, I titled mine TelegramChatBot.
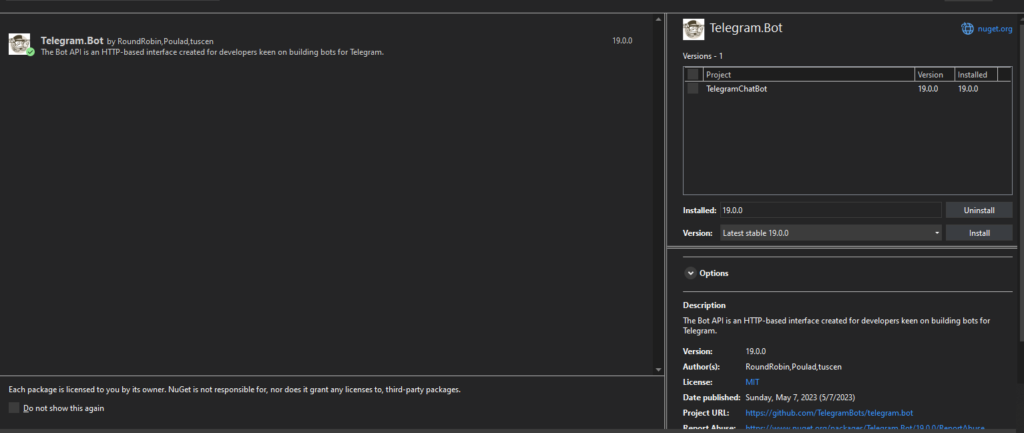
Once the project is created, we need to import the Telegram dependency from NuGet. There are many libraries that exist to help your application interact with Telegram. In this tutorial, I will utilize Telegram.Bot v19.0.0, which you can find and download from NuGet through Visual Studio. Simply open NuGet, search for Telegram.Bot developed by RoundRobin, Poulad, and Tuscen, and proceed with the download Project GitHub here: https://github.com/TelegramBots/telegram.bot
Now, create two classes as per the gist code below, ChatBot.cs and TelegramGPTBots.cs. The ChatBot has properties for a TelegramBotClient, bot name, full name, and personality. The class is initialized with an API token and default values for the bot’s name, full name, and personality, and it starts a Telegram bot client. It includes methods for handling updates from Telegram, managing errors, and a placeholder for the ChatGPT reply functionality which will develop in the proceeding steps..
Within TelegramGPTBots, I’ve initialized two Telegram bots and they are given API tokens, bot names, and other relevant parameters for the creation of a GPT chat bot. A bot client will run independently, and handle updates and communication with the Telegram API while connected. Replace the quoted text, “key”, “botname”, etc, with your Telegram bot info.
Step 2: Interfacing with ChatGPT API:
Within this step we’ll create the functionality to connect to ChatGPT. This will require that you have a ChatGPT account and an API key. You can generate and access your ChatGPT API keys here.
Within your project, create a new class file titled ChatGPT. We will use HttpClient to connect to ChatGPT API and JSON for serializing and deserializing data sent and received.
What is HttpClient?
HttpClient is a class in .NET used to send HTTP requests and receive HTTP responses from a web service or API.
In this class, an instance of HttpClient named client is created. It is used to make an HTTP POST request to the ChatGPT API endpoint.
The client instance is configured with the API key and other request parameters before making the request.
DefaultRequestHeaders.Authorization:
This line of code sets the authorization header for the HttpClient instance. It adds an “Authorization” header with a “Bearer” token, followed by the API key. This header is used to authenticate the request with the ChatGPT API.
By setting the Authorization header, the API key is sent with each request, allowing the API to verify the identity of the sender and grant or deny access accordingly.
What is JSON?
JSON, or JavaScript Object Notation, is a lightweight data interchange format created and used for the purpose of structuring data in an easily transmissible way between client and server.
For this project, we use JSON to create a request object with relevant data, like our query and GPT variables, required for interacting with the ChatGPT API. We then serialize that data with JsonConvert.SerializeObject and sent it to ChatGPT.
ChatGPT then returns its response with a serialized JSON object, which we deserialize and read.
Basic ChatGPT Class:
Now that we have created the ChatGPT functionality, let us come back to ChatBot.cs HandleUpdateAsync function. In this code segment, an instance of ChatGPT is used to create a chat bot response (variable named gptResponse) when a message contains the bot’s name or when it’s a reply to a message from the bot itself. The message text is extracted and passed as a query to ChatGPT, generating a response based on the defined personality. The response is then sent back to the Telegram chat, effectively enabling the chatbot to engage in interactive conversations.
And finally, we need an entry point. Open Program.cs and we’ll write a few lines to start our Telegram bots and handle command prompt entries.
As a game developer, bitmasks are useful when it comes to representing a set of data with single digit in both 3d and 2d games. An illustration of this in use in three dimensions can be found within the well known voxel game minecraft. The current status of a block may be represented with a bitmask value to indicate whether it is open or closed when considering blocks adjacent to it. For a given voxel if one (or however many) side(s) is open but surrounding sides closed, perhaps you wish to show a grass texture or only render one side – that voxel would have a bitmask value based on what surrounds it and we can use that to determine how it should render. If the voxel is completely surrounded, it has a different bitmask value and perhaps you wish not to even render voxels with a bitmask value that indicates it should not be visible. In this usage scenario, what this bitmask value tells you is whether the voxels on each side are open or closed – and this is all saved with a single bit. In other words, through a single bit you are storing a set of data that would otherwise require more memory!
In a 2d game this has all sorts of usage scenario’s too. For example, when it comes to tilemaps and placing tiles there is a huge benefit to storing data represented as a bitmask value. For example, a fence – having a single fence tile may have a stand alone sprite to display, however, placing two fence pieces beside each other may require two different tiles drawn to line up. This means that an algorithm will have to determine the surrounding sides to decide which fence piece should be rendered (i.e. an end piece, middle piece, L shape, etc). We can use a simple calculation to determine this for a 2d tilemap:
With this simple equation, we will then know which tile to display. Below you can see it in action in my game Attack of the Dead – I’ve replaced the wall tiles with some dummy tiles to show the bitmask value for illustration. The variables left, down, right, and up are simple boolean values to indicate whether there is a tile at these positions surrounding the tile you are calculating for.
The textures to display the tile may be named according to the bitmask value for easy organization, or alternatively, you may assign a tile to display based on the bitmask value of that tile and organize your atlas based on the bitmask value.
If you need a quick 4 tile bitmask chart, I’ve thrown one together on JSFiddle below. You can easily modify this for using 8 tiles or whatever suits your needs.